Home Theater Design in the Bay Area
Most national home theater guides start with a basement. They assume 9-foot ceilings, a blank canvas of new drywall, a 200-amp electrical panel, and no seismic considerations worth mentioning. For Bay Area homeowners, that template is almost entirely useless.
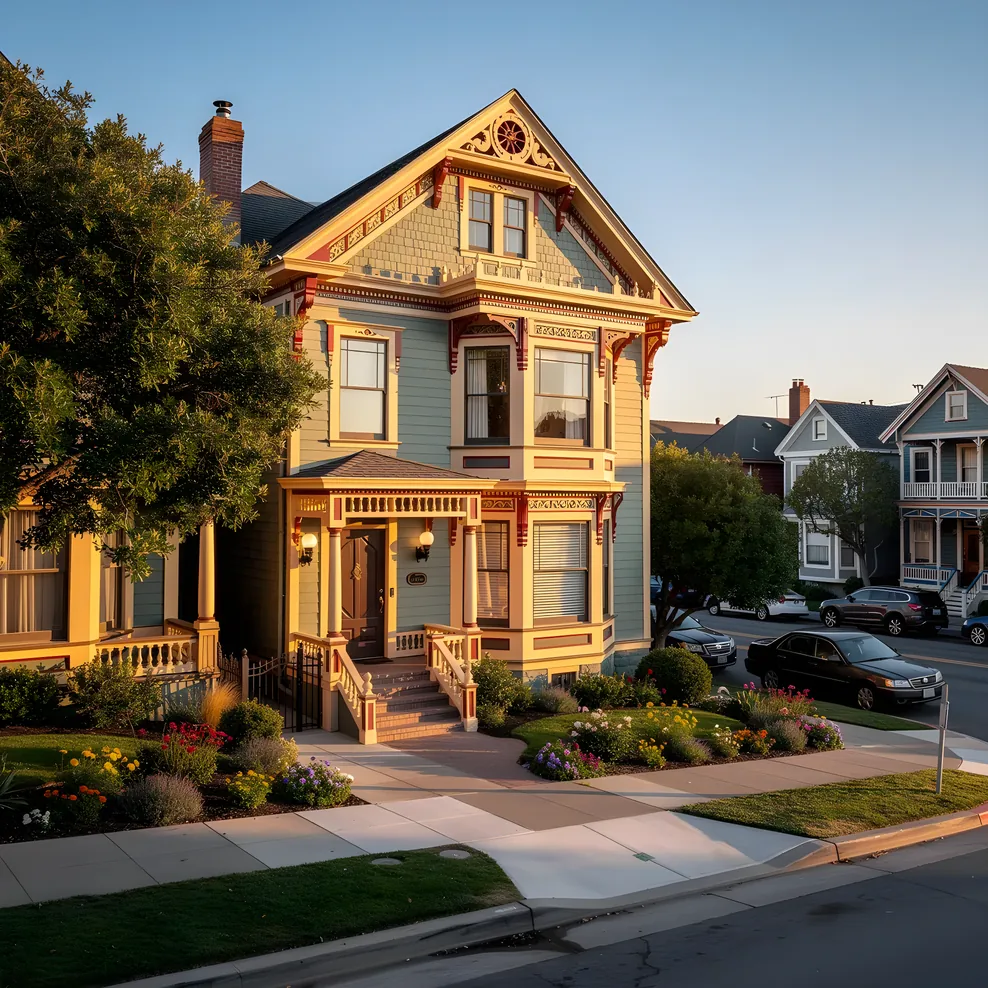
The Bay Area's housing stock was built, in large part, before the idea of a dedicated cinema room existed. Victorian row houses in San Francisco were constructed in the 1890s. Craftsman bungalows in Oakland and Berkeley went up in the 1910s and 1920s. Mid-century modern ranches spread across Marin, the Peninsula, and the South Bay in the 1950s and 1960s. Tract homes across Walnut Creek, Fremont, and San Jose date from an era when a "family room" meant a television on a cart and a sofa. None of these homes were designed for projectors, subwoofers, or Dolby Atmos ceiling speakers.
None of that means a private cinema is out of reach. It means the design process has to start from what is actually in your home, not from a template written for someone else's.
This guide covers what home theater design looks like specifically for Bay Area homes. It is the most detailed resource on this site because the Bay Area presents a set of overlapping constraints that no single national guide addresses: housing stock from multiple eras, no basements, seismic requirements, older electrical infrastructure, California permitting, and a market where contractor labor rates are among the highest in the country.
The Bay Area Housing Stock: What You're Working With
Before any design decisions can be made, you need to understand what kind of building you're designing into. Bay Area homes sort into four broad categories, and each brings its own set of conditions to a home cinema project.
Victorian and Edwardian Homes (pre-1920s)
San Francisco, Oakland, and Alameda have large concentrations of Victorian and Edwardian homes. These buildings share a set of characteristics that affect theater design directly.
Plaster walls over wood lath are the rule, not the exception. Victorian plaster is typically three-coat work, roughly an inch thick, applied over wood lath strips. This is denser and harder than modern drywall, which has some acoustic advantages (mass helps with sound isolation) but creates mounting challenges. Standard drywall anchors do not hold reliably in plaster. Hanging a heavy acoustic panel or a wall-mounted display requires a different approach: either locating and anchoring to lath strips, using a French cleat system that distributes load, or incorporating panels into floor-supported millwork that leans rather than anchors into the wall.
High ceilings in Victorian rooms, often 9 to 10 feet or more, are a genuine asset for home theater design. Height allows ceiling-mounted speakers for overhead audio formats and gives a projector more clearance for proper mounting geometry. The downside is that high ceilings increase the room's acoustic volume, which means more treatment is needed to control reverb and standing waves.
Limited electrical infrastructure is the constraint that catches most Victorian homeowners by surprise. Original knob-and-tube wiring, if it hasn't been replaced, cannot be extended or loaded without a full rewire of the affected circuits. Even updated panels in Victorian homes often cap out at 100 amps, which may not support dedicated theater circuits alongside the rest of the house's load.
Floor plans without obvious room candidates. Victorian homes in San Francisco in particular often have narrow floor plans, 25 feet wide being common, with rooms strung front to back. Finding a room that offers enough depth for a workable throw distance requires measuring carefully. Depth under 12 feet limits screen size to the 80-to-90-inch range with a standard-throw projector; short-throw models extend what's possible in tighter rooms.
Craftsman Homes (1910s-1930s)
Craftsman bungalows in the East Bay and Peninsula bring similar construction to Victorians but with some distinctions. Ceilings are generally lower, often 8 to 9 feet, and the rooms tend to be more open to each other. Original hardwood floors, usually Douglas fir or oak, are nearly universal and are a defining feature most owners do not want to lose.
Those hardwood floors create a real acoustic challenge. Wood reflects high-frequency sound much more aggressively than carpet. In a home cinema, that means flutter echo between the floor and ceiling is common, and first-reflection points on side walls are more active than in a carpeted room. The treatment approach for a Craftsman room with original hardwood is different from a room with carpet: more side-wall absorption, large-format area rugs to recover some floor absorption, and bass traps at corners to address low-frequency buildup that hardwood does not help contain.
The home theater flooring guide covers this specific tradeoff in depth, including options for maintaining original hardwood while recovering acoustic performance through area rugs and underlayment.
Mid-Century Modern and Ranch Homes (1940s-1970s)
Mid-century construction, common across Marin, the South Bay, the Peninsula, and large parts of the East Bay, is more forgiving to work with than Victorian or Craftsman. Walls are typically drywall over wood framing, ceilings run 8 to 9 feet, and electrical panels were often upgraded in the 1970s and 1980s to 100 or 150 amps. Many of these homes have had further electrical updates since.
The common challenge in mid-century homes is room size rather than construction. Ranch homes especially were built with relatively modest room footprints. A 1960s Eichler in Palo Alto might have a living room that is 14 by 18 feet, which is workable for a media room, but a dedicated theater room often requires a bedroom or bonus space that may only run 10 by 12 feet.
Eichlers specifically add a material consideration: post-and-beam construction with tongue-and-groove ceilings and extensive glass. The glass creates significant light control challenges for projection, and the ceiling construction limits options for ceiling-mounted speakers. These are solvable problems, but they have to be identified before equipment is specified.
Newer Tract and Infill Construction (1980s-present)
Homes built from the 1980s onward, concentrated in outer East Bay cities, the South Bay, and newer Peninsula neighborhoods, are the most straightforward to work with. Drywall, 200-amp panels, and in some cases bonus rooms or flex spaces that were designed to serve as media rooms or home offices. Short-throw projector constraints still apply in smaller rooms, but the construction itself does not add the complications of older housing stock.
The Room Selection Problem: No Basements
In most of the country, the basement is the default home theater location. It provides natural acoustic separation from the rest of the house, has no windows creating light control issues, sits below grade which adds thermal mass, and in new construction can be designed from scratch with theater requirements built in.
Bay Area homes do not have basements. California's seismic activity and soil conditions, particularly the Bay Area's expansive clay soils, made basement construction uncommon. The very occasional below-grade space, usually a partial crawlspace, is not a candidate for a cinema room.
Without a basement, Bay Area homeowners are working with one of four room types, and each has a different design profile.
Converted bedroom. The most common option. A spare bedroom, typically 10 by 12 to 12 by 16 feet, converted for theater use. The constraints are ceiling height (usually 8 feet), limited depth for throw distance, and acoustic isolation from adjacent rooms that share walls. The advantage is that it is already a finished room with electrical access, no permit typically required for AV-only work, and a size that is workable for a single-row cinema with 3 to 5 seats.
The small home theater room design guide covers the specific planning math for rooms under 200 square feet, including short-throw projector selection and screen sizing that fits the space rather than overwhelming it.
Bonus room or flex space. A room above a garage, a converted attic space, or a purpose-built bonus room in newer construction. These vary widely in size and condition. Bonus rooms above garages often have angled ceilings that limit speaker placement and require creative acoustic treatment. Converted attic spaces in Victorian homes are often small, oddly shaped, and require meaningful insulation and HVAC work before they are livable.
Interior ground-floor room. In homes with enough rooms, an interior room on the ground floor offers natural acoustic isolation on at least some walls and no exterior light exposure. Finding an interior room with enough square footage is the challenge. This option is more available in larger homes and less common in smaller Bay Area residences.
Garage conversion. The closest Bay Area equivalent to a basement theater. A standard two-car garage gives you 400 to 500 square feet with ceiling heights typically ranging from 9 to 12 feet, and a structure already acoustically separated from the main living space by its construction. The ADU (accessory dwelling unit) trend in California has made garage conversions a familiar process in most Bay Area jurisdictions, which means local contractors and permit offices have experience with the project type.
The design challenges specific to garage conversions are substantial, though. The existing structure is not insulated to living standards, which means thermal control requires a dedicated HVAC solution. The garage door opening has to be properly framed, insulated, and finished. The concrete slab floor is not easily modified for a seating riser without significant work. And a garage conversion in virtually every Bay Area jurisdiction requires a permit. The bay area home theater guide covers garage conversion design and permitting in full.
California Permits: What Triggers One and What Doesn't
Permit requirements in California follow the California Building Code, but enforcement and process vary by county. The general rules are consistent.
Work that does not typically require a permit: Installing AV equipment in an existing finished room. Hanging acoustic panels and a projection screen. Installing a ceiling-mounted projector on an existing finished ceiling. Low-voltage signal wiring (HDMI, speaker wire, control system cable). These are all finish-level or low-voltage work that does not change the structure or expand the electrical system.
Work that typically does require a permit: - Adding dedicated circuits to your electrical panel (this requires an electrical permit and a licensed electrician in virtually every California jurisdiction) - Upgrading the main panel to a higher amperage rating - Framing a new wall or removing a load-bearing wall - Adding or relocating HVAC ducts or equipment - Garage or ADU conversion of any scope
The county matters for timelines and process. San Francisco's Department of Building Inspection has its own review procedures that tend to run longer than suburban jurisdictions. Marin County, with many older homes in ecologically sensitive areas, can add additional requirements. Santa Clara County and its cities (San Jose, Palo Alto, Sunnyvale) have well-developed permit portals that many contractors find more predictable.
One question that comes up regularly from Bay Area homeowners: does adding in-ceiling or in-wall speakers require a permit? The answer is generally no, because low-voltage wiring and speaker installation do not require permits under the California Electrical Code. The exception is if the installation involves cutting into structural members or creating openings that require patching and fire-blocking, which can pull in building inspection.
The full treatment of California permitting for home theater projects is in the California home theater permit guide.
Seismic Considerations: Designing for Lateral Forces
This is the section most national home theater guides omit entirely, and it is not optional for Bay Area homeowners.
A typical dedicated home cinema setup involves a projector mounted to the ceiling, a large fixed-frame or motorized screen anchored to the front wall, an AV rack either free-standing or in a dedicated equipment closet, and in some cases a tiered seating riser. In the normal world, all of these are designed for vertical loads: gravity holds the projector up through the mount, the rack sits on the floor, the screen hangs from wall anchors.
In earthquake country, the equipment also has to resist lateral forces. A 15-pound projector on a standard ceiling mount that is only rated for vertical load can become a projectile in a significant earthquake. A free-standing AV rack with $20,000 of electronics can topple. A large fixed-frame screen with tensioned fabric can pull away from wall anchors if those anchors were only sized for the screen's weight under gravity.
The good news is that the solutions are not complicated once they are specified at design time.
Projector mounts: Use seismically rated ceiling mounts that are bolted into ceiling joists or into blocking installed between joists during rough-in. The mount needs to be rated for the projector's weight multiplied by a seismic acceleration factor, which in most Bay Area locations runs between 1.0g and 1.5g for residential construction. Your AV integrator or a structural engineer can confirm the correct specification.
Cable management: Run projector signal and power cables through flexible conduit rather than rigid pipe. Rigid conduit connected to a ceiling-mounted projector and a wall plate below it creates a fixed connection that can transmit seismic stress to the mount or the wall connection points. Flexible conduit allows relative movement between the projector and the wall.
AV racks: A free-standing rack that is bolted to the floor through the slab or subfloor is the standard approach. If floor-mounting is not practical, wall strapping to a stud at the top of the rack provides lateral resistance. Equipment inside the rack should be on rails with rack-ear fasteners rather than just sitting on shelves.
Projection screens: Fixed-frame screens are typically anchored with four to six wall brackets. Those brackets need to be into studs or blocking, not drywall anchors alone. For motorized screens, the motor housing itself is often the heaviest part and needs its own secure ceiling mount.
Seating risers: A properly built riser is ledger-bolted to the rear wall and anchored to the subfloor at the front. This is good construction practice regardless of seismic concerns, but it becomes a safety issue if the riser is used by multiple people and is not properly secured.
The seismic home theater safety guide covers mount specifications, anchor hardware selection, and rack anchoring in more detail.
Electrical: Panel Capacity and Dedicated Circuits
A home theater draws meaningful electrical load. A typical setup for a dedicated room might include a 4K laser projector pulling 300 to 500 watts, an AV receiver at 400 to 800 watts, separate power amplifiers at 300 to 600 watts each depending on the configuration, and one or two subwoofers at 200 to 500 watts each. Add HVAC for a sealed room, lighting, and any bias lighting or control system power supply, and a fully loaded dedicated theater can easily pull 2,500 to 4,000 watts continuously.
The standard practice for theater rooms is to run at minimum two dedicated 20-amp circuits: one for the AV equipment and amplification, one for projector and lighting. Larger systems with multiple power amplifiers or high-draw projectors may warrant a third circuit. Dedicated circuits are important for two reasons: they protect sensitive electronics from voltage fluctuations caused by other household loads, and they prevent nuisance tripping when high-draw components start up simultaneously.
In Bay Area homes built before 1980, the main panel is often 100 amps. Whether that is enough for a theater addition depends entirely on what is already running. A home where the HVAC has already been upgraded, where an EV charger is pulling 40 amps from the same panel, and where kitchen appliances are on modern circuits may have very little headroom. A simpler house with a modest existing load may be able to accommodate a theater addition with no panel work.
The diagnostic step is a load calculation, which a licensed electrician can perform. They will assess the panel's current total capacity, identify breaker-by-breaker load, and tell you whether a theater addition is feasible within the existing service, or whether a panel upgrade is required.
Panel upgrades to 200-amp service in the Bay Area run $3,000 to $6,000 in most cases, including the electrician's labor, materials, permit, and PG&E or other utility reconnection fees. This cost belongs in the theater budget from the beginning, not as a surprise after the design is complete.
The home theater electrical panel guide walks through how to assess your panel's capacity and what the upgrade process looks like.
Acoustic Design in Bay Area Homes
Acoustic treatment in a Bay Area home is a different problem than acoustic treatment in a new-construction suburban room, and most national guides do not acknowledge that difference.
The dominant surfaces in older Bay Area construction are denser and more reflective than the materials those guides assume. Plaster walls reflect sound more aggressively than drywall. Original hardwood floors reflect more than carpet. Stucco exterior walls add mass but also create different reflection characteristics than standard wood-framed drywall construction. These are not problems, exactly, but they change the treatment prescription.
Understanding what you are treating. Acoustic treatment in a home theater addresses two separate problems that are frequently confused. Soundproofing, more precisely called sound isolation, reduces how much sound passes through the room's walls, floor, and ceiling to the rest of the house or to neighbors. Acoustic treatment, sometimes called room treatment, controls how sound behaves inside the room: reducing flutter echo, taming early reflections, absorbing excess reverb, and managing low-frequency buildup.
Most homeowners need both to some degree, but they are different problems with different solutions. Dense mass (plaster, concrete, brick) helps with sound isolation. Absorptive materials (acoustic foam, fiberglass panels, heavy drapes) handle room treatment. Adding acoustic panels to a room does almost nothing for sound isolation.
Plaster rooms need more first-reflection treatment. In a room with plaster side walls, the first reflection of sound from your front speakers arrives at your ears with more energy than it would in an equivalent drywall room. This makes the acoustic signature of the room more prominent relative to the direct sound from the speakers. The treatment response is to cover first-reflection points on the side walls and the ceiling above the listening position with absorptive panels. The specific positions are typically at the points where a mirror placed against the wall would reflect the front speaker back to the listening position.
Hardwood floors require a different approach than carpet rooms. The floor is a significant reflective surface, and hardwood is much more reflective than carpet. In a theater room where replacing the original hardwood is not acceptable, which is common in Craftsman and Victorian homes, the practical approach is a large, dense area rug covering most of the floor area in the listening zone. A rug with a thick pad underneath recovers a meaningful fraction of the absorption that carpet would provide and reduces the hard reflective path from floor to ceiling that creates flutter echo.
Bass management in smaller rooms. Low-frequency sound in rooms under about 2,000 cubic feet, which includes most converted bedrooms and many bonus rooms, tends to build up at specific frequencies determined by the room's dimensions. This is called room mode, and it creates uneven bass response where some frequencies sound boomy and others seem to disappear. The standard treatment is bass traps at the corners of the room, which absorb low-frequency energy that otherwise builds up at the room's boundaries. Corner placement is important because room modes concentrate at corners.
For plaster-walled rooms, mounting thick corner bass traps requires the same care as mounting any panel. Floor-to-ceiling triangular traps that are floor-supported are generally easier to install in plaster rooms than wall-anchored panels.
The home theater acoustics guide covers treatment placement principles, the difference between soundproofing and room treatment, and how Bay Area construction materials change the acoustic equation.
Screen Size and Throw Distance in Bay Area Room Sizes
Bay Area converted rooms are often smaller than the idealized room dimensions in national guides. Most planning content is written for rooms with 20-foot depths. Bay Area conversions commonly run 12 to 15 feet deep.
The critical relationship is between room depth and projector throw ratio. A projector's throw ratio describes how wide an image it produces at a given distance from the screen. A 1.5:1 throw ratio means the projector needs 1.5 feet of distance for every foot of screen width. A standard-throw 1080p projector at a 2.0:1 ratio needs 20 feet to fill a 10-foot-wide (120-inch diagonal) screen.
In a 12-foot-deep room, that projector can only fill a screen that is 6 feet wide, about a 90-inch diagonal. To push the screen larger in a constrained room, you need a lower throw ratio. Short-throw projectors (0.4:1 to 1.0:1 ratios) and ultra-short-throw projectors (below 0.4:1) are designed for exactly this situation. They are more expensive than standard-throw units at equivalent quality levels, but in a Bay Area room with limited depth, they are often the only way to achieve the screen size that makes the space feel like a cinema rather than a living room with a large TV.
The projector vs TV guide and projector selection guide both address throw ratio selection for specific room depths.
Smart Home Integration as a Design Starting Point
Bay Area homeowners, particularly in the tech-forward markets of San Jose, Palo Alto, San Francisco, and the inner East Bay, often already have some smart home infrastructure in place when they begin a theater project. Lutron Caseta dimmers on the lights. Sonos or similar networked audio in the living areas. Apple HomeKit, Google Home, or an Alexa ecosystem running the household.
This existing infrastructure should be accounted for in the theater design from the beginning, not retrofitted as an afterthought.
Lighting control. A theater room's lighting needs to respond to the viewing experience: dim smoothly when a movie starts, hold a low bias lighting level during viewing, and restore quickly when it ends. Lutron Caseta is the consumer-grade platform that integrates with essentially everything and handles the theater use case well. Control4 or Savant are the professional-grade platforms that AV integrators work with for whole-home integration. The choice of platform should be made before conduit is run, because the control wiring in the walls needs to match the system.
Network infrastructure. This is the item most frequently overlooked in theater planning. A 4K projector streaming content over Wi-Fi from a living room router through two or three walls is not a reliable configuration. A dedicated home cinema should have wired Ethernet from the AV rack to your home network, with a proper switch in the rack. During rough-in, this means pulling Cat6 or Cat6A to the theater room, which is a $200 material and $150 to $300 labor item when the walls are open and a significantly larger project if the room is already finished.
Control systems. A dedicated theater room benefits from a control system that triggers scenes: "Movie mode" drops the lights, pulls the shade or blackout curtain, powers up the projector, and routes audio. At the consumer level, this can be handled by a smart remote like a Logitech Harmony-style system integrated with your lighting platform. At the professional level, Control4 or Savant handle the full scene sequence from a single touch.
The smart home integration guide covers platform selection, wiring requirements, and how to coordinate theater AV control with an existing home automation setup.
Noise and Neighbors: Bay Area Housing Density
Bay Area housing density, particularly in San Francisco, Oakland, Berkeley, and dense Peninsula cities, means that sound transmission to adjacent units and neighbors is a real design constraint, not an abstract consideration.
In a single-family home, sound transmission concerns are primarily within the house: whether the theater's subwoofer frequencies travel up through the floor to bedrooms above, or whether dialogue is audible in the adjacent bedroom. These are manageable with decoupled wall construction and resilient ceiling channels if you are building from scratch, or with bass management and SPL discipline if you are working in an existing finished room.
In an attached home, a townhouse, or a condo, the situation is more serious. A subwoofer in a concrete-floor building transmits structure-borne bass very efficiently through the slab to adjacent units. A theater room in a townhouse with shared walls requires either robust sound isolation construction (double-stud walls with decoupled assemblies, mass-loaded vinyl, and resilient ceiling treatment) or a decision to limit low-frequency output in ways that compromise the cinema experience.
For HOA situations, it is worth reviewing your CC&Rs before committing to a theater buildout. Some HOAs have quiet hour requirements or restrictions on construction that limit what is possible. An HOA that prohibits amplified sound audible in adjacent units is a real constraint that affects both the speaker configuration and the hours of use.
Design Styles That Work in Bay Area Housing
The aesthetic direction for a Bay Area home cinema should start from the building it is going into, not from a Pinterest board assembled for a different house type entirely.
For Victorian and Craftsman homes, the design approaches that work best acknowledge the existing architectural character rather than trying to override it. Deep-toned wall treatments in forest green, navy, or charcoal read as intentional against the original moldings and hardwood. Fabric-wrapped acoustic panels can double as wall art and match period-appropriate textile patterns. Millwork for equipment storage can reference the built-in cabinetry that is often already present in these homes. The result feels like the room belongs in the house, which is important for resale value and for the daily experience of living in the space.
For mid-century homes, a contemporary minimal approach works particularly well. Clean lines, concealed equipment behind acoustically transparent panels, furniture that reads as living room rather than dedicated theater. An Eichler interior in particular responds well to a quiet, elegant media room treatment that does not compete with the architecture.
For newer construction, the full range of theater aesthetics is available. The dark, immersive cinema treatment with tiered seating, starfield ceilings, and dedicated acoustical wall panels in velvet-backed fabric is feasible in a purpose-built bonus room or a garage conversion where you are starting from an empty shell.
The home theater design ideas guide covers these aesthetic directions with more detail on how each translates in Bay Area home contexts.
Finding the Right Bay Area Installer
The complexity of a Bay Area home theater project, with its combination of older construction, seismic requirements, California permitting, and electrical considerations, makes the choice of installer more consequential than in a simpler market.
An AV integrator who works regularly in Bay Area older homes has experience solving the problems described in this guide. They know how to anchor into plaster without damaging it, how to run conduit in a house with original balloon framing, how to specify seismically rated mounts for projectors and racks, and how to coordinate with licensed electricians and GCs when permit work is required. A generalist installer who primarily works in new construction will bring a different knowledge set.
Questions worth asking before signing with any integrator:
- What experience do you have in pre-1970 Bay Area homes with plaster walls?
- How do you specify seismic anchoring for projector mounts and AV racks?
- Do you coordinate with licensed electricians and GCs for permit-required work, or do you have licensed electricians on staff?
- Can you walk me through your acoustic treatment approach for a room with hardwood floors?
- What control system platforms do you work with, and how do those integrate with existing Lutron or Apple HomeKit systems?
For a list of Bay Area specialists, bayareaavpros.com covers vetted integrators across the East Bay, South Bay, Peninsula, Marin, and San Francisco.
Where to Go from Here
The design process for a Bay Area home cinema follows a specific sequence that is different from what most national guides recommend. Start with the room, not the equipment. Understand the construction before specifying any mounts or acoustic treatment. Verify electrical capacity before finalizing the system tier. Confirm permit requirements before scheduling any rough-in work.
For room dimensions and how they interact with screen size and projector selection, the home theater room dimensions guide works through the math for real Bay Area room sizes. For seating layout, the seating guide covers row spacing, riser design, and sightlines for rooms under 200 square feet. For how Bay Area construction costs compare to national ranges, the Bay Area home theater cost guide gives tier-by-tier pricing with Bay Area labor rates built in.
For the design guides covering the other rooms in your silo, the dedicated home theater guide addresses what it takes to build a room that serves no other purpose. The media room vs home theater comparison helps if you are still deciding which configuration fits your household. And if lighting design is where you want to focus next, the home theater lighting guide covers bias lighting, dimmers, and smart scene control in depth.
Frequently Asked Questions
What are the biggest home theater design challenges in Bay Area homes?
The four most common challenges are: no basements (most Bay Area homes are on slabs or raised foundations), older housing stock with plaster walls and lath construction, electrical panels that predate the load requirements of modern AV systems, and seismic codes that require proper anchoring for ceiling-mounted projectors and AV racks. Each has workable solutions, but they have to be designed in from the start rather than addressed after the fact.
Do I need a permit to build a home theater in California?
For AV equipment installed in an existing finished room, no permit is typically required. The threshold changes when work becomes structural or electrical: framing a new wall, adding dedicated circuits, upgrading your electrical panel, or converting a garage or unfinished space all trigger permit requirements under the California Building Code. Requirements vary by county, and Bay Area jurisdictions including San Francisco, Marin, Santa Clara, and Contra Costa each have their own processes and timelines.
How do you handle acoustic treatment in a home with plaster walls?
Plaster walls are harder to mount panels to and cannot accept drywall anchors the same way modern construction can. The practical approaches are: using French cleat systems that distribute load across multiple lath strips, mounting panels to a perimeter frame that rests against the wall rather than anchoring into plaster, or incorporating acoustic treatment into custom millwork that is floor-supported. Plaster is also denser than drywall, which means it reflects high frequencies more aggressively and typically requires more first-reflection treatment, not less.
What should I do if my Bay Area home has a 100-amp electrical panel?
First, assess what is currently on the panel. Many Bay Area homes with 100-amp service have enough headroom for one or two dedicated circuits if the rest of the house is not heavily loaded. A licensed electrician can review your panel's current draw and determine whether a theater room is feasible without an upgrade. If an upgrade is needed, a 200-amp service upgrade in the Bay Area typically costs between $3,000 and $6,000 once you include electrician labor, permits, and utility reconnection.
How do I mount a projector safely in earthquake country?
Use a seismically rated mount bolted into a ceiling joist or blocking, not into drywall or plaster alone. Run cable through flexible conduit to allow for movement between the projector and wall connection points. For AV racks, floor anchoring or wall strapping at the top of the rack is standard practice. These requirements should be specified to your installer before any rough-in work happens.
Can I convert a garage into a home theater in the Bay Area?
Yes, and it is one of the most common paths to a dedicated home cinema here, given that basements are not available. A standard two-car garage offers 400 to 500 square feet with ceiling heights typically ranging from 9 to 12 feet. The design challenges include thermal insulation, acoustic isolation, the slab floor, and permitting. In most Bay Area jurisdictions, a permit is required for garage conversion work. The ADU trend has made the process more familiar in most permit offices.
What room dimensions work for a home theater in a Bay Area converted bedroom?
A 10-by-14-foot room can support a single-row cinema with a screen in the 90-to-100-inch range using a short-throw projector. A 12-by-16-foot room opens up a 100-to-110-inch screen and allows for two or three seats with better sightlines. Rooms under 10 feet wide create side-wall acoustic problems and constrain speaker placement enough that full surround sound becomes difficult to implement correctly. Ceiling height of 8 feet is workable but limits overhead speaker options. Nine feet or more makes the audio design significantly more flexible.
How does coastal Bay Area humidity affect a home theater?
Coastal locations in San Francisco, Daly City, Pacifica, and the western Peninsula see meaningful ambient humidity from marine layer fog. For a home cinema, a mini-split or dedicated HVAC unit sized for the room keeps temperature and humidity stable, and equipment stored in a ventilated rack avoids heat and moisture buildup. Inland East Bay locations, with much lower humidity, typically do not require specific planning for moisture.
The complete Bay Area home theater planning guide collection is at Bay Area Home Cinema.