Dedicated Home Theater Rooms
A dedicated home theater room is exactly what the name says: a room with one job. No other furniture, no competing uses, no ambient light leaking under the door. The lights are controlled, the acoustics are treated, the seating is fixed, and every design decision has been made in service of one experience.
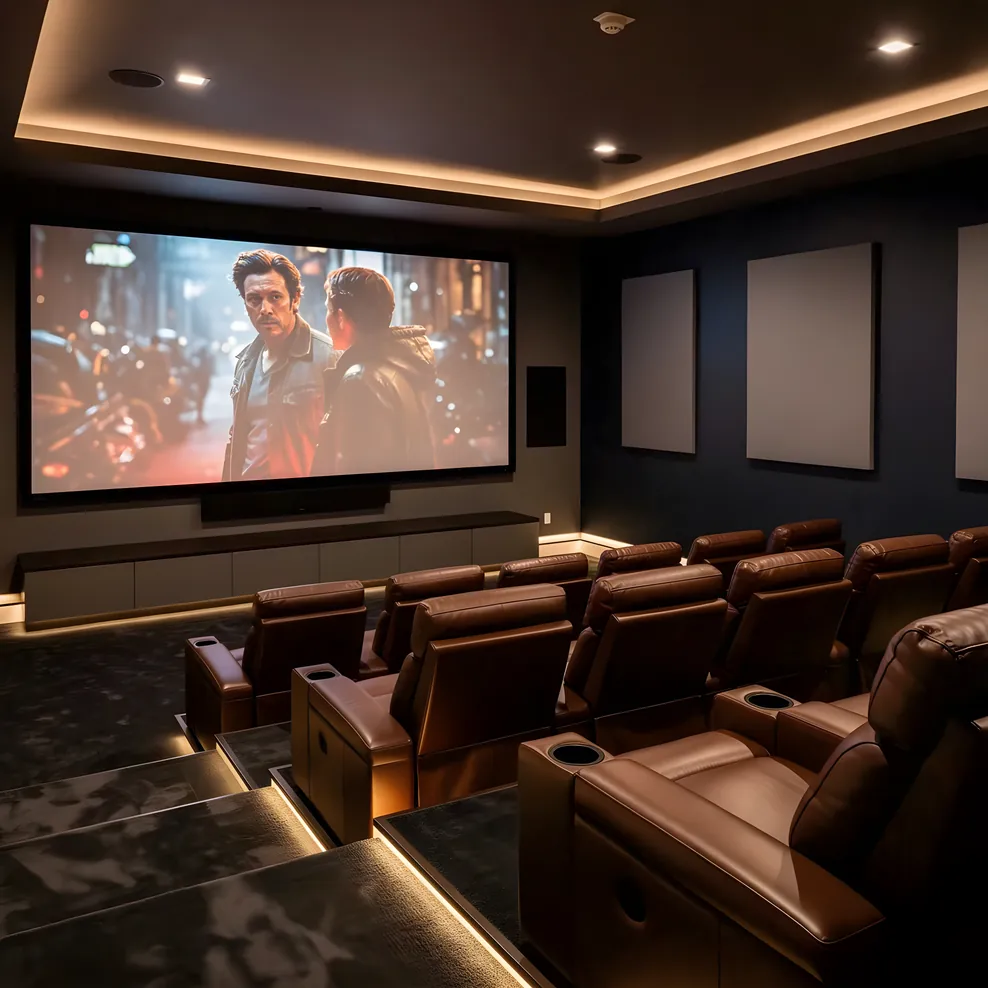
That sounds obvious until you see what most people actually build. A flat panel mounted in a living room with blackout curtains on the windows is not a dedicated theater, even if it cost more than one. Neither is a projector in a bedroom that also serves as an office. The distinction matters because a genuinely dedicated room performs differently than a multipurpose space at every price point. The room design is doing as much work as the equipment, and when the two are calibrated to each other, the result is noticeably different from a nice TV in a nice room.
In the Bay Area, the path to a dedicated cinema room is almost always through conversion. No basements. Older housing stock with rooms that were built for other purposes. ADU shells that pivoted. A bonus room above a garage that was finished and unused. The question is not usually "where do I add a new room?" but "what existing room can become this?"
What a Dedicated Room Actually Means
The functional definition of a dedicated home theater has three components that have to work together: complete light control, treated acoustics, and equipment calibrated to the space.
Light control means the room can be brought to true darkness when the projector is on. Every window needs a blackout solution. Every door frame, cable penetration, and HVAC vent is a potential light leak. This is harder than it sounds in Bay Area homes, where many spare bedrooms have east or west-facing windows with no practical way to add exterior shading. The solution is interior — layered blackout treatments, light-sealed doors, and sometimes a light trap vestibule if the room is at the end of a hallway that gets direct daylight.
Treated acoustics means the room has been designed so sound behaves predictably at the listening position. Left untreated, a rectangular room creates flutter echo (a ringing, smeared quality on dialogue), bass buildup in corners, and early reflections from side walls that confuse the surround sound image. Treatment typically involves absorptive panels on the side walls and ceiling, bass traps in the corners, and either carpet or a combination of rug and acoustic underlayment on the floor. The goal is not a dead room — it is a controlled one where the system's audio output reaches your ears as intended, not as a garbled version filtered through the room's resonances.
Calibrated equipment means the system has been tuned for the specific room rather than configured to default settings. A proper room calibration process (whether manual or using an automated calibration tool built into the AV receiver) adjusts speaker levels, timing delays, and equalization based on actual measurements at the listening position. This step is frequently skipped in media room setups where the TV is moved around and the room configuration changes. In a dedicated room, calibration happens once and stays until something changes.
The Dedicated Room vs the Media Room
The clearest way to understand what a dedicated room requires is to compare it to a media room, which is the alternative most Bay Area homeowners end up with.
A media room is a flexible shared space. The display is large. The audio is better than a standard living room setup. But the room tolerates ambient light, the seating can be rearranged, and it serves other functions during the day. A media room is a very good TV room. A dedicated home theater is a controlled cinema environment.
This is not a hierarchy where one is categorically better. For most Bay Area families, a well-designed media room is the right answer because the space they have available serves multiple household functions and committing a room exclusively to cinema use is not realistic. The dedicated theater makes sense when the space can actually be dedicated, when the household uses it enough to justify the exclusivity, and when the performance ceiling of a controlled environment is the actual goal.
If you are working through that decision, the media room vs home theater guide covers the tradeoffs in detail. What follows here is for the homeowner who has already decided the dedicated room is the right call and wants to understand what it takes to plan and build one.
Room Requirements
Size
The minimum room for a functional dedicated home theater is approximately 12 feet wide by 20 feet deep, with a ceiling height of at least 8 feet. This gives you room for a 120-inch screen, a reasonable throw distance for a standard projector, two rows of seating with appropriate spacing, and enough wall surface for acoustic treatment to work effectively.
The 12 by 20 minimum is livable but constrained. At that size, you have room for two rows of two or three seats, but the room will feel tight and acoustic treatment options are limited. A 14 by 24 or larger room opens up meaningfully: you can fit three rows of seating, more wall surface for treatment, and better flexibility on projector placement.
Most Bay Area spare bedrooms fall in the 10 by 12 to 12 by 15 range, which is below this minimum. A converted bedroom of that size works, but it requires careful selection of a short-throw or ultra-short-throw projector, a screen sized appropriately for the viewing distance (typically 90 to 100 inches rather than 120+), and seating limited to one or two rows. If the room is under 150 square feet, the small home theater room guide addresses the specific constraints and solutions for that scale.
Bonus rooms above garages and ADU shells typically offer more square footage, which is one reason they have become a common conversion path in the Bay Area. A 20 by 24 bonus room gives you real design flexibility, and the separation from the main living space makes acoustic isolation easier.
Ceiling Height
Eight feet is the practical minimum for a ceiling-mounted projector. Below 8 feet, a ceiling mount places the projector too close to the audience seating, either blocking the image or requiring a very steep downward throw angle that degrades image quality.
If you are planning a riser for a second row of seating, the calculation changes. Riser height (typically 8 to 12 inches) plus the sightline clearance needed over the front row requires additional ceiling height at the rear of the room. A room with an 8-foot flat ceiling can accommodate a riser if the front row seating is low enough and the screen placement is correct, but it is tight. Nine feet is more comfortable. Vaulted or sloped ceilings common in Bay Area bonus rooms require individual analysis: the slope may work in your favor toward the screen end of the room, or it may create mounting complications.
Electrical
A dedicated home theater room needs at least two dedicated 20-amp circuits: one for the projector and video processing equipment, one for the audio system. Larger installations with power amplifiers, lighting control systems, or high-end AV processors may need three or four circuits.
Bay Area homes built before 1960 often have 100-amp main panels that are at or near capacity. Adding dedicated circuits for a home theater in an older Craftsman or Victorian frequently means a panel upgrade. This is a real cost line item in the Bay Area, where electricians typically charge more than the national average and permit fees from the local jurisdiction add another layer. Budget $3,000 to $8,000 for a panel upgrade depending on your jurisdiction and the scope of the electrical work required.
Acoustic Isolation
Acoustic isolation and acoustic treatment are related but different problems. Isolation is about preventing sound from leaving the room (or entering it). Treatment is about how sound behaves inside the room.
A dedicated home theater plays at high volume. For most Bay Area homeowners whose neighbors are close or whose households have varied schedules, isolation is not optional. A room that sounds great inside but drives sound into adjacent bedrooms at midnight is not a working dedicated theater.
True isolation requires mass and decoupling. Mass comes from adding layers to walls, floors, and ceiling. Decoupling means breaking the direct connection between the room's framing and the surrounding structure so vibration cannot transmit mechanically. Double-layer drywall with Green Glue compound between layers is the standard light-isolation treatment for converted rooms. For serious isolation, staggered-stud or floating wall construction significantly improves performance but requires more wall thickness and more demolition.
In Bay Area construction, plaster walls on lath are actually better performers for isolation than modern drywall, because the mass is higher. The catch is that adding layers to a plaster wall is more complicated than adding to drywall, and patching disturbed areas after running cable requires a plasterer rather than a drywall finisher. Budget for that trade specifically.
The floor is often the overlooked isolation path. Sound traveling through a floor into rooms below is a persistent problem in two-story homes and bonus rooms above garages. Floating floor systems (a resilient underlayment that decouples the finish floor from the subfloor) address this, but they add height. In a room with 8-foot ceilings that you are already tightening with a riser, every inch matters.
Light Control in Bay Area Homes
California light is persistent. The Bay Area's year-round sunshine and long daylight hours mean that a room that achieves darkness at 8 PM in December may flood with light through a west-facing window at 6 PM in June. Dedicated room design has to account for seasonal variation, not just the room's orientation at the moment of installation.
The approach depends on window configuration:
Motorized roller shades with true blackout fabric are the standard solution for rooms with modern double-hung or casement windows. These integrate with lighting control systems and can be activated on the same scene preset that dims the room lights and engages the projector. Quality blackout roller shades in a Bay Area installation typically run $400 to $900 per window including hardware and control integration.
Layered treatment works for rooms where a single motorized shade is not enough: a blackout cellular shade or roller shade positioned inside the window reveal, combined with floor-to-ceiling blackout drapery panels that overlap the window frame by 8 to 12 inches on each side. The overlap is what prevents edge bleed at the curtain edge, which is the most common failure point in DIY blackout installations.
Light trap vestibule is a structural solution for rooms at the end of a hallway with no way to prevent light from entering under or around the door. A short anteroom or curtained alcove between the hallway and the theater door provides a light buffer zone so that the main room remains dark even when the door is opened briefly.
Bay Area permitting does not typically require permits for motorized shade or drape installation. Structural modifications for light trap vestibules may trigger a permit depending on whether load-bearing walls are involved. Check with your local building department before opening walls.
Seating in a Dedicated Room
Seating in a dedicated theater is fixed, not flexible. That distinction from a media room matters for planning: you are designing a specific number of seats at specific positions, and everything about the room (screen size, speaker placement, acoustic treatment, riser height) calibrates to those positions.
Viewing Distance and Screen Size
The primary viewing distance is measured from the center of your seating to the screen surface. At that distance, the screen needs to subtend a specific angle of view for the image to feel immersive without eye fatigue. The Society of Motion Picture and Television Engineers (SMPTE) recommends a field of view of at least 30 degrees for cinematic immersion, which works out to roughly 1.5 times the screen height as your minimum viewing distance.
For a 120-inch 16:9 screen (58.8 inches tall), that puts the front-row optimal viewing distance at about 7.4 feet. Most people find this closer than they expect. A second row adds 4 to 5 feet behind the first, putting it at 11 to 12 feet from the screen.
Row Spacing and Risers
Row spacing in a dedicated theater is typically 52 to 60 inches from seat back to seat back. This accommodates theater-style recliners (which extend to 68 to 74 inches in full recline) and provides enough floor clearance for someone to pass through without disturbing an occupied seat.
A riser for the second row serves two purposes: it improves sightlines over first-row head heights, and it provides a natural separation between rows that reduces the risk of the second row kicking the back of first-row seats. Standard riser height is 8 to 12 inches. The riser surface itself should be carpeted to reduce footstep noise and prevent slipping.
Riser construction is typically a simple framed platform finished with drywall and carpet. In Bay Area homes, the most common complication is the floor below: hardwood subfloor may require blocking for secure fastening, and in older homes, subfloor level can vary enough that a sleeper system under the riser is needed for a level finished surface.
Seating Options
Dedicated home theater seating ranges from purpose-built theater recliners with cup holders and USB charging, to sectional sofas adapted for fixed positions, to high-end custom upholstered chairs that look nothing like a movie theater but perform comparably.
The operational constraint in a dedicated room is that whatever you choose has to fit through the door before the room is finished. Oversized theater recliners that arrive as assembled units frequently cannot navigate a residential door frame. Confirm the assembled width of any seating before purchase, or choose modular configurations that assemble on-site.
Equipment for a Dedicated Room
Equipment selection for a dedicated theater follows from room design, not the other way around. The primary decisions are:
Projection vs flat panel. In a dedicated room with controlled light, a projector is the natural choice because it can scale to large screen sizes that a flat panel cannot match at comparable cost. The minimum projector specification for a dedicated room is a 4K native resolution unit with a contrast ratio sufficient to produce deep blacks in the room's controlled conditions. (4K refers to a resolution of approximately 4,000 horizontal pixels, which produces a noticeably sharper image than 1080p at the screen sizes typical in dedicated rooms.)
Screen. A fixed-frame screen in a dedicated room outperforms a retractable screen in most cases, because the frame maintains constant tension and the screen surface stays flat. Screen gain — the degree to which the screen reflects light back toward the viewer versus scattering it — is a design decision that depends on your projector's brightness and whether the room has any ambient light to manage.
Audio configuration. A dedicated room is the right environment for a full Dolby Atmos configuration, which uses ceiling-mounted speakers above the listening position to add height channels to the sound field. The room needs sufficient ceiling height for in-ceiling or on-ceiling height speakers, and the AV receiver needs to support the number of channels you are running. For a well-executed Atmos installation, plan for a minimum 7.2.4 configuration: seven main channel speakers, two subwoofers, and four height channels.
The home theater equipment guides cover each of these decisions in more depth, with attention to how room dimensions and acoustic conditions affect the specifications that make sense.
Converting Bay Area Spaces
The most common conversion paths for dedicated home theater rooms in the Bay Area:
Spare bedroom. A bedroom that is genuinely unused is the simplest conversion because the room already has finished walls, electrical, HVAC, and a door. The constraints are typically size (most Bay Area spare bedrooms are on the small side), window orientation (a south or west-facing bedroom may need more aggressive light control), and acoustic separation from adjacent bedrooms. Converting a spare bedroom to a dedicated theater typically does not require a building permit if no structural work is involved, though electrical work for additional circuits will require a permit.
Bonus room above a garage. Bonus rooms over garages often offer the most useful combination of attributes: larger square footage, structural isolation from the main living space (reducing sound transmission to bedrooms), and less concern about light control on the garage-facing side. The ceiling may be sloped, which requires custom projector mounting solutions, and the floor over an uninsulated garage can be cold. HVAC access is often limited, requiring supplemental mini-split units for climate control. Check whether the room was built with a permit and whether any conversion work will trigger permit requirements in your jurisdiction.
ADU shell or garage conversion. Detached ADUs and converted garages offer true structural isolation because they are separate buildings. Sound does not transmit to the main residence at all. The tradeoffs are the cost of HVAC, electrical service, and finishing a space that may be in a more raw condition than the main house, plus the ADU conversion process itself, which in most Bay Area jurisdictions now has streamlined permitting but still requires plan check and inspection. If you are in the process of planning an ADU and have flexibility on layout, designing one end of the ADU as a dedicated theater space from the start costs significantly less than retrofitting a finished space.
For a broader look at how Bay Area construction conditions affect home theater planning, the Bay Area home theater guide covers permitting, seismic considerations, older housing stock, and real cost ranges with Bay Area labor rates included.
Planning Your Dedicated Room
The sequencing of a dedicated room project matters. The most common planning mistake is specifying equipment before finalizing the room design, which leads to projectors that don't fit the throw distance, audio systems configured for ideal room positions that turn out to be impossible after walls are closed, and lighting control systems that were not roughed in during the electrical phase.
The right sequence is:
- Confirm the room dimensions, ceiling height, and structural constraints before any other decision
- Determine the seating layout (number of rows, row positions, riser or no riser) based on room depth and ceiling height
- Establish the screen position and size based on the first-row viewing distance
- Specify the projector based on the throw distance from projector position to screen
- Design the audio system based on the room dimensions and confirmed speaker positions
- Rough in all electrical, conduit, and low-voltage wiring before closing walls
- Install acoustic treatment after walls and ceiling are finished but before seating
- Calibrate the system after seating is in place and the room is fully treated
This sequence keeps each decision grounded in confirmed room geometry rather than ideal specifications that may not survive contact with the actual space.
If you are ready to talk through what a specific room can support, the Bay Area home theater installers directory lists local specialists who do site assessments before any equipment is specified. The full planning guide collection is at Bay Area Home Cinema.
Frequently Asked Questions
What is the minimum room size for a dedicated home theater?
The practical minimum for a dedicated home theater room is 12 feet wide by 20 feet deep with at least 8-foot ceilings. This allows for a 120-inch screen, adequate projector throw distance, two rows of seating, and sufficient wall surface for acoustic treatment. Smaller rooms can work with short-throw projectors and appropriately scaled screens, but require more careful planning around seating capacity and projector selection.
What is the difference between a dedicated home theater and a media room?
A dedicated home theater serves no other function: it has controlled lighting that can achieve true darkness, acoustic treatment calibrated to the room, fixed seating at specific positions, and equipment tuned to the space. A media room is a flexible shared space with a large display and better-than-average audio, but it tolerates ambient light and multi-use furniture. Dedicated theaters deliver higher performance but require a room that can truly be committed to that single purpose.
Do I need a permit to convert a spare bedroom into a home theater in the Bay Area?
Converting a spare bedroom to a dedicated home theater typically does not require a permit if no structural work is involved. However, adding dedicated electrical circuits for the theater equipment does require an electrical permit in all Bay Area jurisdictions. Any work that involves opening walls, changing the room's HVAC configuration, or adding a riser that requires structural fastening may trigger additional permit requirements. Check with your local building department before starting any work.
How much acoustic isolation does a dedicated home theater need?
The amount of isolation you need depends on how the theater room relates to adjacent spaces and household schedules. A bonus room above a garage that shares no wall with a bedroom has a very different isolation requirement than a converted bedroom between two other occupied bedrooms. Minimum isolation improvements include double-layer drywall with acoustic compound on shared walls, solid-core doors with door seals, and floating floor treatment if there are occupied rooms below. Serious isolation for high-volume use may require staggered-stud or fully decoupled wall construction.
Can I convert an ADU into a dedicated home theater in the Bay Area?
Yes, and a detached ADU is often an excellent candidate for a dedicated theater because the structural separation from the main residence provides natural acoustic isolation. ADU conversions in the Bay Area now have streamlined permitting in most jurisdictions, but the project still requires plan check and inspection for any work involving electrical, HVAC, or structural changes. If you have flexibility in ADU layout planning, designing theater-optimized dimensions and electrical rough-in from the start is significantly less expensive than retrofitting a finished space.
What kind of projector do I need for a dedicated home theater room?
A dedicated home theater room with controlled light is the ideal environment for a projector. The minimum specification for a room designed for regular use is a 4K native resolution projector (approximately 4,000 horizontal pixels) with a contrast ratio sufficient to produce deep blacks in controlled conditions. The throw ratio — how far the projector needs to be from the screen to fill it — is determined by your room depth and screen size. This measurement should be confirmed before purchasing a projector, since throw ratios vary significantly between models and a mismatch is not easily corrected after installation.